Nest JS -Clean code using Hexagonal Architecture
Software architecture is key in responding to dynamic market pressures. a well-designed software allows organizations to add new features faster to respond to new market insights.
This post explains how to implement the Hexagonal Architecture using Nest JS (a Node framework).
Overview
This post’s example takes a common use case of a business that needs to receive a customer ticket, process it, and then store it in a data store.
Nest JS comes with a built-in dependency injection, which makes implementing Hexagonal Architecture easy. It comes also with a bunch of preinstalled libraries to help build REST APIs.
Application Architecture

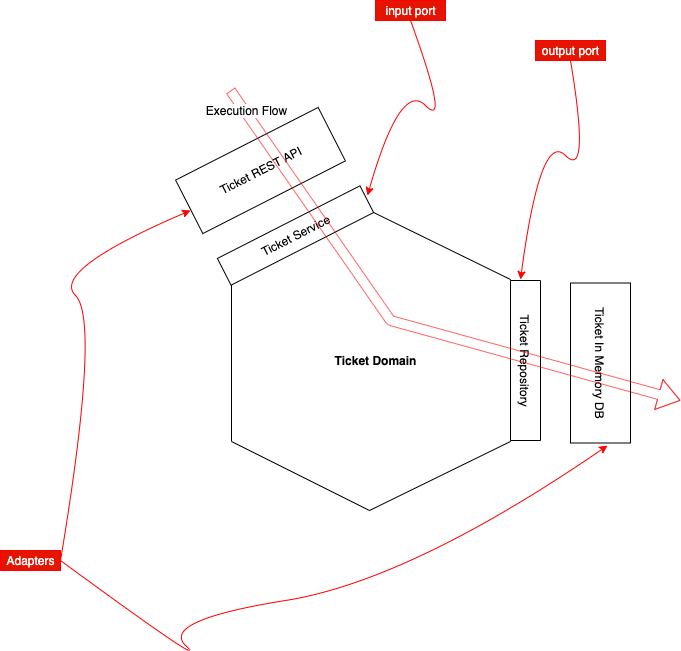
The application code is split into two main components, the Application Core Domain and the Adapters.
The Core Domain contains the implementation of the business logic or functional requirements, for example in our use case, a customer can only have 3 active tickets.
The Adapters contain the implementation logic of the Non-functional requirements, like exposing a REST API to receive the customer ticket and storing it in the Postgres database.
How does it work?
The Core Domain exposes two types of ports, Input ports and output ports.
Input ports are implemented methods that can be called from outside the Domain package, usually, these methods are called by Adapters.
Output ports are interfaces that specify behaviours that Adapters must implement.
Adapters implement the Output ports interfaces, then dependency injection is used to inject the desired Output port Adapter implementation at runtime.
Code
To start we need an existing or new Nest JS application, then create a new module, in my case I created a new module named ticket using the following command
$ nest generate moduleInside our module, we need to create some directories where we’ll be creating our Domain Entities, Domain Input Ports, Domain Output Ports and Adapters.
$ cd ticket && mkdir -p adapters/db adapters/api domain/model domain/portsNow let’s start implementing our classes.
Inside the directory domain/model create the class Ticket
import { randomUUID } from 'crypto';
export class Ticket {
  private id: string;
  description: string;
  status: TicketStatus;
  createAt: Date;
  updateAt: Date;
  priority: Number;
  constructor(description: string, priority: Number) {
    this.id = randomUUID();
    this.description = description;
    this.status = TicketStatus.OPEN;
    this.createAt = new Date();
    this.updateAt = new Date();
    this.priority = priority;
  }

  isClosed(): boolean {
    return this.status === TicketStatus.CLOSED;
  }
}

enum TicketStatus {
  OPEN = 'OPEN',
  IN_PROGRESS = 'IN_PROGRESS',
  CLOSED = 'CLOSED',
}
Next, we’ll create a class TicketService inside domain/ports which will be our domain input port.
In lines 15 to 17 we implemented the functional requirement to limit max active tickets to 3.
import { Inject, Injectable } from '@nestjs/common';
import { Ticket } from '../model/ticket.model';
import { TicketRepository } from './ticket.repository';

@Injectable()
export class TicketService {
  constructor(
    @Inject(TicketRepository)
    private readonly tickerRepository: TicketRepository,
  ) {}

  create(description: string, priority: Number): Ticket {
    const ticket = new Ticket(description, priority);
    // TODO: check count of tickets less than 3
    if (this.findActiveTickets().length >= 3) {
      throw new Error('Ticket count is more than 3');
    }
    this.tickerRepository.create(ticket);
    return ticket;
  }

  findAll(): Ticket[] {
    return this.tickerRepository.findAll();
  }

  findActiveTickets(): Ticket[] {
    return this.tickerRepository.findAll().filter((ticket) => !ticket.isClosed);
  }
}
As you can see our TicketService needs a TicketRepository to retrieve and store data. since we are working inside the Domain package the repository should be an abstraction that will be implemented later in the Adapter.
In our case, an Interface that describes two behaviours create a ticket and find all tickets.
import { Ticket } from '../model/ticket.model';

export interface TicketRepository {
  create(ticket: Ticket): Ticket;
  findAll(): Ticket[];
}

export const TicketRepository = Symbol('TicketRepository');
Alright, we are done with the domain component, Let’s jump to the Adapters.
Inside adapters/api directory create TicketController class to expose two REST APIs, create a new ticket and list all tickets. The controller uses the Input port from our ticket domain package to execute the business logic
import { Body, Controller, Get, Logger, Post } from '@nestjs/common';
import { TicketService } from 'src/ticket/domain/ports/ticket.service';

import { TicketCommand } from './ticket.command';

@Controller({
  path: 'tickets',
  version: ['1'],
})
export class TicketController {
  private readonly logger = new Logger(TicketController.name);

  constructor(private ticketService: TicketService) {}

  @Get()
  findAll(): any[] {
    return this.ticketService.findAll();
  }

  @Post()
  create(@Body() tickeCommand: TicketCommand): any {
    const ticker = this.ticketService.create(
      tickeCommand.description,
      tickeCommand.priority,
    );
    this.logger.debug(tickeCommand);
    this.logger.debug({ ticker });
    return { ...ticker };
  }
}
TicketCommand is a simple class we use to deserialize the body, and add some client validation on the class properties before we pass it to the domain model.
import { IsNotEmpty } from 'class-validator';

export class TicketCommand {
  @IsNotEmpty()
  description: string;
  priority: Number;
}
Next, inside adapters/db directory create TicketInMemory class, this class is the adapter for the Output port TicketRepository interface from our domain package
import { Injectable } from '@nestjs/common';
import { Ticket } from 'src/ticket/domain/model/ticket.model';
import { TicketRepository } from 'src/ticket/domain/ports/ticket.repository';

@Injectable()
export class TicketInMemory implements TicketRepository {
  private readonly tickets: Ticket[] = [];

  create(ticket: Ticket): Ticket {
    this.tickets.push(ticket);
    return ticket;
  }

  findAll(): Ticket[] {
    return this.tickets;
  }
}
Now that we have an implementation for the Output port, we need to tell the framework to use this implementation when we call the abstract methods from the interface.
Inside the module configuration file ticket.module.ts, we need to explicitly tell our application to use the class TicketInMemory that implement the interface TicketRepository, lines 16 and 17
import { Logger, Module } from '@nestjs/common';
import { TicketController } from './adapters/api/ticket.controller';
import { TicketApiService } from './adapters/api/ticketApi.service';
import { TicketRepository } from './domain/ports/ticket.repository';
import { TicketInMemory } from './adapters/db/ticketInMemory.repository';
import { TicketService } from './domain/ports/ticket.service';

@Module({
  imports: [Logger],
  controllers: [TicketController],

  providers: [
    TicketService,
    TicketApiService,
    {
      provide: TicketRepository,
      useClass: TicketInMemory, // can add condition on ENV, inject mock impl for unit testing
    },
  ],
})
export class TicketModule {}
Conclusion
This blog post shows how to write clean testable code using Nest JS, DI and Hexagonal Architecture. As you can see the Architecture is simple to work with, there is no reason to be afraid next time you hear about it.
Download the code from this repository.